首先通过一个反正切函数,找到一帧激光点云起始时刻和结束时刻的航向角,第二步的作用是将一帧激光点云的航向角度限制在 [pi , 3pi] 之间,方便后续计算出一帧激光点云的时间。\n\n### 4. projectPointCloud()\n\n距离图像投影
将3D point cloud投影映射到2D range image
将激光雷达数据投影成一个16x1800(依雷达角分辨率而定)的点云阵列\n\n```\n // 距离图像投影\n // 将3D point cloud投影映射到2D range image\n // 将激光雷达数据投影成一个16x1800(依雷达角分辨率而定)的点云阵列\n void projectPointCloud(){\n \n // range image projection\n float verticalAngle, horizonAngle, range;\n size_t rowIdn, columnIdn, index, cloudSize; \n PointType thisPoint;\n\n cloudSize = laserCloudIn->;points.size();\n\n // 遍历整个点云 \n for (size_t i = 0; i <; cloudSize; ++i){\n \n // 提取点云中 x y z 坐标数值\n thisPoint.x = laserCloudIn->;points[i].x;\n thisPoint.y = laserCloudIn->;points[i].y;\n thisPoint.z = laserCloudIn->;points[i].z;\n\n // find the row and column index in the iamge for this point\n // 判断是不是使用了 velodyne 的雷达\n if (useCloudRing == true){\n \n // 提取激光雷达线束到 rowIdn \n rowIdn = laserCloudInRing->;points[i].ring;\n }\n // 是其他的雷达 就通过俯仰角 确定当前的激光点是来自哪个线束 index \n else{\n \n verticalAngle = atan2(thisPoint.z, sqrt(thisPoint.x * thisPoint.x + thisPoint.y * thisPoint.y)) * 180 / M_PI;\n rowIdn = (verticalAngle + ang_bottom) / ang_res_y; //确定行索引\n }\n if (rowIdn <; 0 || rowIdn >;= N_SCAN)\n continue;\n\n horizonAngle = atan2(thisPoint.x, thisPoint.y) * 180 / M_PI;\n\n // 保证 columnIdn 的大小在 [0 , 1800)\n columnIdn = -round((horizonAngle-90.0)/ang_res_x) + Horizon_SCAN/2; //确定列索引\n if (columnIdn >;= Horizon_SCAN)\n columnIdn -= Horizon_SCAN;\n\n if (columnIdn <; 0 || columnIdn >;= Horizon_SCAN)\n continue;\n\n // 如果距离小于 1米 则过滤掉 通常是过滤自身(距离传感器比较近的点)\n range = sqrt(thisPoint.x * thisPoint.x + thisPoint.y * thisPoint.y + thisPoint.z * thisPoint.z); //确定深度\n if (range <; sensorMinimumRange)\n continue;\n \n // 将计算下来的距离传感器的 数值保存到 rangeMat 中 \n // 这是一个 16 * 1800 的矩阵 rowIdn为线束数值 columnIdn 是 一圈圆形 滩平之后的数值\n // range 是特征点云点到原点的数值\n // 这样就将一个三维的坐标 转换到一个 矩阵中了.\n rangeMat.at<;float>;(rowIdn, columnIdn) = range;\n\n // 将 index 和 横坐标存储在 intensity 中 整数部分是线束数值 小数部分是方向角度\n thisPoint.intensity = (float)rowIdn + (float)columnIdn / 10000.0;\n\n //深度图的索引值 index = 列号 + 行号 * 1800 \n index = columnIdn + rowIdn * Horizon_SCAN;\n\n // fullCloud 存放的是坐标信息(二维的)\n // fullInfoCloud 增加了点到传感器的距离信息(三维的) \n fullCloud->;points[index] = thisPoint;\n fullInfoCloud->;points[index] = thisPoint;\n\n // intensity 中存放的是点云点到传感器的距离\n fullInfoCloud->;points[index].intensity = range; // the corresponding range of a point is saved as \"intensity\"\n }\n }\n\n```\n\n此处对激光点云的处理是 LEGO-LOAM 和 LOAM 的第一个区别。这里将一帧激光点云处理成一个 16 * 1800 像素的图片。 16代表的是激光雷达的线束,1800代表的是激光扫描一圈时候是 间隔0.5度发射一个激光束 所以 360 * 0.5 = 1800\n\n 再者,rangeMat.at(rowIdn, columnIdn) 这里调用了一个 opencv 的多维数组,数组中的行与列 对应的就是图片的长和宽,然后数组中存放的数值就是图片相应位置上面的点到激光雷达的距离。\n\n 最后将点云的坐标信息存储在 intensity 中,采用的方法是:整数+小数 存储。整数部分存储的是激光线束数值,小数部分存储的水平航向值。\n\natan2(y,x);\n\n反正切的角度等于X轴与通过原点和给定坐标点(x, y)的直线之间的夹角,结果为正表示从X轴逆时针旋转的角度,结果为负表示从X轴顺时针旋转的角度;\n\n1. 确定行索引 根据ring id或者根据坐标计算:
 \n1. 确定列索引([ − π , π ] 转换为 [ 0 , 1800 ]):
 \n1. 确定深度值:(注意数据的有效范围)
 \n\n### 5. groundRemoval()\n\n首先。判断地面点的标志就是相邻两个激光线束扫描到点的坐标,如果两个坐标之间的差值 或者两个坐标之间的斜率大于一个设定的值,则将该点\n\n判断是地面点。所以此处用到了激光点云图片的深度信息\n\n```\n // 移除地面点\n // 根据上下两线之间点的位置计算两线之间俯仰角判断,小于10度则为地面点\n \n void groundRemoval(){\n \n size_t lowerInd, upperInd;\n float diffX, diffY, diffZ, angle;\n \n // groundMat\n // -1, no valid info to check if ground of not 没有有效的信息确认是不是地面\n // 0, initial value, after validation, means not ground 确认不是地面点\n // 1, ground\n for (size_t j = 0; j <; Horizon_SCAN; ++j){\n \n // 前7个激光雷达扫描线束足够满足地面点的检测 所以只遍历 7 次\n for (size_t i = 0; i <; groundScanInd; ++i){\n \n //groundScanInd定义打到地面上激光线的数目\n lowerInd = j + ( i )*Horizon_SCAN;\n upperInd = j + (i+1)*Horizon_SCAN;\n\n // 如果之前计算过的 intensity 是 -1 则直接默认为是一个无效点\n if (fullCloud->;points[lowerInd].intensity == -1 ||\n fullCloud->;points[upperInd].intensity == -1){\n \n // no info to check, invalid points 对这个无效点直接进行贴标签\n groundMat.at<;int8_t>;(i,j) = -1;\n continue;\n }\n \n diffX = fullCloud->;points[upperInd].x - fullCloud->;points[lowerInd].x;\n diffY = fullCloud->;points[upperInd].y - fullCloud->;points[lowerInd].y;\n diffZ = fullCloud->;points[upperInd].z - fullCloud->;points[lowerInd].z;\n\n // 计算相邻两个线束之间的夹角 \n angle = atan2(diffZ, sqrt(diffX*diffX + diffY*diffY) ) * 180 / M_PI;\n\n //垂直方向相邻两点俯仰角小于10度就判定为地面点;相邻扫描圈\n if (abs(angle - sensorMountAngle) <;= 10){\n \n groundMat.at<;int8_t>;(i,j) = 1;\n groundMat.at<;int8_t>;(i+1,j) = 1;\n }\n }\n }\n\n // extract ground cloud (groundMat == 1)\n // mark entry that doesn\'t need to label (ground and invalid point) for segmentation\n // note that ground remove is from 0~N_SCAN-1, need rangeMat for mark label matrix for the 16th scan\n\n // 给地面点 标记一个符号 为 -1 \n for (size_t i = 0; i <; N_SCAN; ++i){\n \n for (size_t j = 0; j <; Horizon_SCAN; ++j){\n \n if (groundMat.at<;int8_t>;(i,j) == 1 || rangeMat.at<;float>;(i,j) == FLT_MAX){\n \n labelMat.at<;int>;(i,j) = -1;\n }\n }\n }\n\n // 发布点云信息,只发布地面点云信息\n if (pubGroundCloud.getNumSubscribers() != 0){\n \n for (size_t i = 0; i <;= groundScanInd; ++i){\n \n for (size_t j = 0; j <; Horizon_SCAN; ++j){\n \n if (groundMat.at<;int8_t>;(i,j) == 1)\n groundCloud->;push_back(fullCloud->;points[j + i*Horizon_SCAN]);\n }\n }\n }\n }\n\n```\n\n垂直相邻两点俯仰角小于10度就判定为地面点。\n\n### 6. cloudSegmentation()\n\n从论文中可以看到,分割函数的来源参考了两篇论文 ( Effificient Online Segmentation for Sparse 3D Laser Scans ,另外一篇 Fast Range Image-Based Segmentation of Sparse 3D Laser Scans for Online Operation)的方法 。方法的原理可以参考知乎文章 [《地面点障碍物快速分割聚类》](https://zhuanlan.zhihu.com/p/72932303) 。\n\n```\n // 点云分割\n // 首先对点云进行聚类标记,根据标签进行对应点云块存储;\n \n void cloudSegmentation(){\n \n // segmentation process\n for (size_t i = 0; i <; N_SCAN; ++i) // 16线的 一个线束一个的遍历\n for (size_t j = 0; j <; Horizon_SCAN; ++j) // 水平 的 1800\n if (labelMat.at<;int>;(i,j) == 0) // 对非地面点进行点云分割\n labelComponents(i, j); // 调用这个函数对点云进行分割聚类\n\n int sizeOfSegCloud = 0;\n\n // extract segmented cloud for lidar odometry\n // 提取分割点云 用于激光雷达里程计\n for (size_t i = 0; i <; N_SCAN; ++i) {\n \n\n segMsg.startRingIndex[i] = sizeOfSegCloud-1 + 5;\n\n for (size_t j = 0; j <; Horizon_SCAN; ++j) {\n \n if (labelMat.at<;int>;(i,j) >; 0 || groundMat.at<;int8_t>;(i,j) == 1){\n \n // outliers that will not be used for optimization (always continue)\n // 勾勒出优化过程中不被使用的值\n\n // 1. 如果label为999999则跳过\n if (labelMat.at<;int>;(i,j) == 999999){\n \n if (i >; groundScanInd && j % 5 == 0){\n \n outlierCloud->;push_back(fullCloud->;points[j + i*Horizon_SCAN]);\n continue;\n }else{\n \n continue;\n }\n }\n\n // majority of ground points are skipped\n // 2. 如果为地,跳过index不是5的倍数的点\n if (groundMat.at<;int8_t>;(i,j) == 1){\n \n if (j%5!=0 && j>;5 && j<;Horizon_SCAN-5)\n continue;\n }\n // mark ground points so they will not be considered as edge features later\n segMsg.segmentedCloudGroundFlag[sizeOfSegCloud] = (groundMat.at<;int8_t>;(i,j) == 1);\n // mark the points\' column index for marking occlusion later\n segMsg.segmentedCloudColInd[sizeOfSegCloud] = j;\n // save range info\n segMsg.segmentedCloudRange[sizeOfSegCloud] = rangeMat.at<;float>;(i,j);\n // save seg cloud\n segmentedCloud->;push_back(fullCloud->;points[j + i*Horizon_SCAN]);\n // size of seg cloud\n ++sizeOfSegCloud;\n }\n }\n\n segMsg.endRingIndex[i] = sizeOfSegCloud-1 - 5;\n }\n \n // extract segmented cloud for visualization\n if (pubSegmentedCloudPure.getNumSubscribers() != 0){\n \n for (size_t i = 0; i <; N_SCAN; ++i){\n \n for (size_t j = 0; j <; Horizon_SCAN; ++j){\n \n if (labelMat.at<;int>;(i,j) >; 0 && labelMat.at<;int>;(i,j) != 999999){\n \n segmentedCloudPure->;push_back(fullCloud->;points[j + i*Horizon_SCAN]);\n segmentedCloudPure->;points.back().intensity = labelMat.at<;int>;(i,j);\n }\n }\n }\n }\n }\n\n```\n\n### 7. labelComponents()\n\n```\n // 标签组件\n // 局部特征检测聚类\n // 平面点与边缘点\n \n void labelComponents(int row, int col){\n \n // use std::queue std::vector std::deque will slow the program down greatly\n float d1, d2, alpha, angle;\n int fromIndX, fromIndY, thisIndX, thisIndY; \n bool lineCountFlag[N_SCAN] = {\n false};\n\n // 传进来的两个参数,按照坐标不同分别给他们放到 X 与 Y 的数组中\n queueIndX[0] = row;\n queueIndY[0] = col;\n int queueSize = 1; // 需要计算角度的点的数量\n int queueStartInd = 0;\n int queueEndInd = 1;\n\n allPushedIndX[0] = row;\n allPushedIndY[0] = col;\n int allPushedIndSize = 1;\n \n while(queueSize >; 0){\n \n // Pop point\n fromIndX = queueIndX[queueStartInd];\n fromIndY = queueIndY[queueStartInd];\n --queueSize;\n ++queueStartInd;\n // Mark popped point\n labelMat.at<;int>;(fromIndX, fromIndY) = labelCount;\n // Loop through all the neighboring grids of popped grid\n\n // 遍历整个点云,遍历前后左右四个邻域点,求点之间的角度数值 \n for (auto iter = neighborIterator.begin(); iter != neighborIterator.end(); ++iter){\n \n // new index\n thisIndX = fromIndX + (*iter).first;\n thisIndY = fromIndY + (*iter).second;\n // index should be within the boundary\n if (thisIndX <; 0 || thisIndX >;= N_SCAN)\n continue;\n // at range image margin (left or right side)\n if (thisIndY <; 0)\n thisIndY = Horizon_SCAN - 1;\n if (thisIndY >;= Horizon_SCAN)\n thisIndY = 0;\n // prevent infinite loop (caused by put already examined point back)\n if (labelMat.at<;int>;(thisIndX, thisIndY) != 0)\n continue;\n\n //比较得出较大深度与较小深度\n d1 = std::max(rangeMat.at<;float>;(fromIndX, fromIndY), \n rangeMat.at<;float>;(thisIndX, thisIndY));\n d2 = std::min(rangeMat.at<;float>;(fromIndX, fromIndY), \n rangeMat.at<;float>;(thisIndX, thisIndY));\n\n if ((*iter).first == 0)\n alpha = segmentAlphaX;\n else\n alpha = segmentAlphaY;\n\n angle = atan2(d2*sin(alpha), (d1 -d2*cos(alpha))); //平面聚类公式,角度越大两点越趋向于平面\n //segmentTheta=60度\n if (angle >; segmentTheta){\n \n\n queueIndX[queueEndInd] = thisIndX;\n queueIndY[queueEndInd] = thisIndY;\n ++queueSize;\n ++queueEndInd;\n\n labelMat.at<;int>;(thisIndX, thisIndY) = labelCount;\n lineCountFlag[thisIndX] = true;\n\n allPushedIndX[allPushedIndSize] = thisIndX;\n allPushedIndY[allPushedIndSize] = thisIndY;\n ++allPushedIndSize;\n }\n }\n }\n\n // check if this segment is valid\n bool feasibleSegment = false;\n\n // 如果是 allPushedIndSize 累加的数量增加到了30 个 则判断这部分点云属于一个聚类\n if (allPushedIndSize >;= 30)\n feasibleSegment = true; //面点\n\n // 如果垂直 方向上点的数量大于 5个 默认是一个有效的聚类\n else if (allPushedIndSize >;= segmentValidPointNum){\n \n int lineCount = 0;\n for (size_t i = 0; i <; N_SCAN; ++i)\n if (lineCountFlag[i] == true)\n ++lineCount;\n if (lineCount >;= segmentValidLineNum)\n feasibleSegment = true; //边点 \n }\n \n // segment is valid, mark these points\n if (feasibleSegment == true){\n \n ++labelCount;\n }else{\n // segment is invalid, mark these points\n for (size_t i = 0; i <; allPushedIndSize; ++i){\n \n labelMat.at<;int>;(allPushedIndX[i], allPushedIndY[i]) = 999999;\n }\n }\n }\n\n```\n\n取去除地面的 labelMat,逐点开始计算邻域4点(邻域的索引要注意有效范围),与中心点比较出距离的最大值与最小值,通过下面公式结合阈值π / 3,大于该值则构成平面特征为平面点,队列存储索引,labelMat 存储标签值,同时 lineCountFlag 置 true,直到不满足阈值跳出进行下步。\n\n\n\n
\n\n### 5. groundRemoval()\n\n首先。判断地面点的标志就是相邻两个激光线束扫描到点的坐标,如果两个坐标之间的差值 或者两个坐标之间的斜率大于一个设定的值,则将该点\n\n判断是地面点。所以此处用到了激光点云图片的深度信息\n\n```\n // 移除地面点\n // 根据上下两线之间点的位置计算两线之间俯仰角判断,小于10度则为地面点\n \n void groundRemoval(){\n \n size_t lowerInd, upperInd;\n float diffX, diffY, diffZ, angle;\n \n // groundMat\n // -1, no valid info to check if ground of not 没有有效的信息确认是不是地面\n // 0, initial value, after validation, means not ground 确认不是地面点\n // 1, ground\n for (size_t j = 0; j <; Horizon_SCAN; ++j){\n \n // 前7个激光雷达扫描线束足够满足地面点的检测 所以只遍历 7 次\n for (size_t i = 0; i <; groundScanInd; ++i){\n \n //groundScanInd定义打到地面上激光线的数目\n lowerInd = j + ( i )*Horizon_SCAN;\n upperInd = j + (i+1)*Horizon_SCAN;\n\n // 如果之前计算过的 intensity 是 -1 则直接默认为是一个无效点\n if (fullCloud->;points[lowerInd].intensity == -1 ||\n fullCloud->;points[upperInd].intensity == -1){\n \n // no info to check, invalid points 对这个无效点直接进行贴标签\n groundMat.at<;int8_t>;(i,j) = -1;\n continue;\n }\n \n diffX = fullCloud->;points[upperInd].x - fullCloud->;points[lowerInd].x;\n diffY = fullCloud->;points[upperInd].y - fullCloud->;points[lowerInd].y;\n diffZ = fullCloud->;points[upperInd].z - fullCloud->;points[lowerInd].z;\n\n // 计算相邻两个线束之间的夹角 \n angle = atan2(diffZ, sqrt(diffX*diffX + diffY*diffY) ) * 180 / M_PI;\n\n //垂直方向相邻两点俯仰角小于10度就判定为地面点;相邻扫描圈\n if (abs(angle - sensorMountAngle) <;= 10){\n \n groundMat.at<;int8_t>;(i,j) = 1;\n groundMat.at<;int8_t>;(i+1,j) = 1;\n }\n }\n }\n\n // extract ground cloud (groundMat == 1)\n // mark entry that doesn\'t need to label (ground and invalid point) for segmentation\n // note that ground remove is from 0~N_SCAN-1, need rangeMat for mark label matrix for the 16th scan\n\n // 给地面点 标记一个符号 为 -1 \n for (size_t i = 0; i <; N_SCAN; ++i){\n \n for (size_t j = 0; j <; Horizon_SCAN; ++j){\n \n if (groundMat.at<;int8_t>;(i,j) == 1 || rangeMat.at<;float>;(i,j) == FLT_MAX){\n \n labelMat.at<;int>;(i,j) = -1;\n }\n }\n }\n\n // 发布点云信息,只发布地面点云信息\n if (pubGroundCloud.getNumSubscribers() != 0){\n \n for (size_t i = 0; i <;= groundScanInd; ++i){\n \n for (size_t j = 0; j <; Horizon_SCAN; ++j){\n \n if (groundMat.at<;int8_t>;(i,j) == 1)\n groundCloud->;push_back(fullCloud->;points[j + i*Horizon_SCAN]);\n }\n }\n }\n }\n\n```\n\n垂直相邻两点俯仰角小于10度就判定为地面点。\n\n### 6. cloudSegmentation()\n\n从论文中可以看到,分割函数的来源参考了两篇论文 ( Effificient Online Segmentation for Sparse 3D Laser Scans ,另外一篇 Fast Range Image-Based Segmentation of Sparse 3D Laser Scans for Online Operation)的方法 。方法的原理可以参考知乎文章 [《地面点障碍物快速分割聚类》](https://zhuanlan.zhihu.com/p/72932303) 。\n\n```\n // 点云分割\n // 首先对点云进行聚类标记,根据标签进行对应点云块存储;\n \n void cloudSegmentation(){\n \n // segmentation process\n for (size_t i = 0; i <; N_SCAN; ++i) // 16线的 一个线束一个的遍历\n for (size_t j = 0; j <; Horizon_SCAN; ++j) // 水平 的 1800\n if (labelMat.at<;int>;(i,j) == 0) // 对非地面点进行点云分割\n labelComponents(i, j); // 调用这个函数对点云进行分割聚类\n\n int sizeOfSegCloud = 0;\n\n // extract segmented cloud for lidar odometry\n // 提取分割点云 用于激光雷达里程计\n for (size_t i = 0; i <; N_SCAN; ++i) {\n \n\n segMsg.startRingIndex[i] = sizeOfSegCloud-1 + 5;\n\n for (size_t j = 0; j <; Horizon_SCAN; ++j) {\n \n if (labelMat.at<;int>;(i,j) >; 0 || groundMat.at<;int8_t>;(i,j) == 1){\n \n // outliers that will not be used for optimization (always continue)\n // 勾勒出优化过程中不被使用的值\n\n // 1. 如果label为999999则跳过\n if (labelMat.at<;int>;(i,j) == 999999){\n \n if (i >; groundScanInd && j % 5 == 0){\n \n outlierCloud->;push_back(fullCloud->;points[j + i*Horizon_SCAN]);\n continue;\n }else{\n \n continue;\n }\n }\n\n // majority of ground points are skipped\n // 2. 如果为地,跳过index不是5的倍数的点\n if (groundMat.at<;int8_t>;(i,j) == 1){\n \n if (j%5!=0 && j>;5 && j<;Horizon_SCAN-5)\n continue;\n }\n // mark ground points so they will not be considered as edge features later\n segMsg.segmentedCloudGroundFlag[sizeOfSegCloud] = (groundMat.at<;int8_t>;(i,j) == 1);\n // mark the points\' column index for marking occlusion later\n segMsg.segmentedCloudColInd[sizeOfSegCloud] = j;\n // save range info\n segMsg.segmentedCloudRange[sizeOfSegCloud] = rangeMat.at<;float>;(i,j);\n // save seg cloud\n segmentedCloud->;push_back(fullCloud->;points[j + i*Horizon_SCAN]);\n // size of seg cloud\n ++sizeOfSegCloud;\n }\n }\n\n segMsg.endRingIndex[i] = sizeOfSegCloud-1 - 5;\n }\n \n // extract segmented cloud for visualization\n if (pubSegmentedCloudPure.getNumSubscribers() != 0){\n \n for (size_t i = 0; i <; N_SCAN; ++i){\n \n for (size_t j = 0; j <; Horizon_SCAN; ++j){\n \n if (labelMat.at<;int>;(i,j) >; 0 && labelMat.at<;int>;(i,j) != 999999){\n \n segmentedCloudPure->;push_back(fullCloud->;points[j + i*Horizon_SCAN]);\n segmentedCloudPure->;points.back().intensity = labelMat.at<;int>;(i,j);\n }\n }\n }\n }\n }\n\n```\n\n### 7. labelComponents()\n\n```\n // 标签组件\n // 局部特征检测聚类\n // 平面点与边缘点\n \n void labelComponents(int row, int col){\n \n // use std::queue std::vector std::deque will slow the program down greatly\n float d1, d2, alpha, angle;\n int fromIndX, fromIndY, thisIndX, thisIndY; \n bool lineCountFlag[N_SCAN] = {\n false};\n\n // 传进来的两个参数,按照坐标不同分别给他们放到 X 与 Y 的数组中\n queueIndX[0] = row;\n queueIndY[0] = col;\n int queueSize = 1; // 需要计算角度的点的数量\n int queueStartInd = 0;\n int queueEndInd = 1;\n\n allPushedIndX[0] = row;\n allPushedIndY[0] = col;\n int allPushedIndSize = 1;\n \n while(queueSize >; 0){\n \n // Pop point\n fromIndX = queueIndX[queueStartInd];\n fromIndY = queueIndY[queueStartInd];\n --queueSize;\n ++queueStartInd;\n // Mark popped point\n labelMat.at<;int>;(fromIndX, fromIndY) = labelCount;\n // Loop through all the neighboring grids of popped grid\n\n // 遍历整个点云,遍历前后左右四个邻域点,求点之间的角度数值 \n for (auto iter = neighborIterator.begin(); iter != neighborIterator.end(); ++iter){\n \n // new index\n thisIndX = fromIndX + (*iter).first;\n thisIndY = fromIndY + (*iter).second;\n // index should be within the boundary\n if (thisIndX <; 0 || thisIndX >;= N_SCAN)\n continue;\n // at range image margin (left or right side)\n if (thisIndY <; 0)\n thisIndY = Horizon_SCAN - 1;\n if (thisIndY >;= Horizon_SCAN)\n thisIndY = 0;\n // prevent infinite loop (caused by put already examined point back)\n if (labelMat.at<;int>;(thisIndX, thisIndY) != 0)\n continue;\n\n //比较得出较大深度与较小深度\n d1 = std::max(rangeMat.at<;float>;(fromIndX, fromIndY), \n rangeMat.at<;float>;(thisIndX, thisIndY));\n d2 = std::min(rangeMat.at<;float>;(fromIndX, fromIndY), \n rangeMat.at<;float>;(thisIndX, thisIndY));\n\n if ((*iter).first == 0)\n alpha = segmentAlphaX;\n else\n alpha = segmentAlphaY;\n\n angle = atan2(d2*sin(alpha), (d1 -d2*cos(alpha))); //平面聚类公式,角度越大两点越趋向于平面\n //segmentTheta=60度\n if (angle >; segmentTheta){\n \n\n queueIndX[queueEndInd] = thisIndX;\n queueIndY[queueEndInd] = thisIndY;\n ++queueSize;\n ++queueEndInd;\n\n labelMat.at<;int>;(thisIndX, thisIndY) = labelCount;\n lineCountFlag[thisIndX] = true;\n\n allPushedIndX[allPushedIndSize] = thisIndX;\n allPushedIndY[allPushedIndSize] = thisIndY;\n ++allPushedIndSize;\n }\n }\n }\n\n // check if this segment is valid\n bool feasibleSegment = false;\n\n // 如果是 allPushedIndSize 累加的数量增加到了30 个 则判断这部分点云属于一个聚类\n if (allPushedIndSize >;= 30)\n feasibleSegment = true; //面点\n\n // 如果垂直 方向上点的数量大于 5个 默认是一个有效的聚类\n else if (allPushedIndSize >;= segmentValidPointNum){\n \n int lineCount = 0;\n for (size_t i = 0; i <; N_SCAN; ++i)\n if (lineCountFlag[i] == true)\n ++lineCount;\n if (lineCount >;= segmentValidLineNum)\n feasibleSegment = true; //边点 \n }\n \n // segment is valid, mark these points\n if (feasibleSegment == true){\n \n ++labelCount;\n }else{\n // segment is invalid, mark these points\n for (size_t i = 0; i <; allPushedIndSize; ++i){\n \n labelMat.at<;int>;(allPushedIndX[i], allPushedIndY[i]) = 999999;\n }\n }\n }\n\n```\n\n取去除地面的 labelMat,逐点开始计算邻域4点(邻域的索引要注意有效范围),与中心点比较出距离的最大值与最小值,通过下面公式结合阈值π / 3,大于该值则构成平面特征为平面点,队列存储索引,labelMat 存储标签值,同时 lineCountFlag 置 true,直到不满足阈值跳出进行下步。\n\n\n\n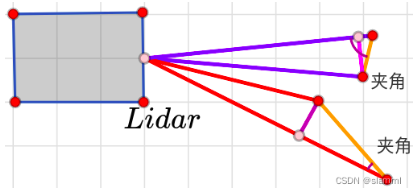
聚类,超过30个点聚为一类,labelCount++;
小于30超过5,统计垂直方向聚类点数,超过3个也标记为一类;
若都不满足,则赋值999999表示需要舍弃的聚类点。\n\n\n\n### 8. publishCloud()\n\n发布各类点云数据\n\n### 9. resetParameters()\n\n参数重置\n\n> \nLeGO-LOAM首先进行地面分割,找到地面之后,对地面之上的点进行聚类。聚类的算法如下图,主要是根据斜率对物体做切割,最后得到地面和分割后的点云。上述步骤的关键是要理解如何进行地面分割和点云分割。
 \n点云分割完成之后,接下来对分割后的点云提取特征,提取的特征的目的是进行点云配准,从而得出当前位姿。\n\n\n## 2、featureAssociation —— 特征提取与匹配\n\n订阅分割点云、外点、imu数据,总体流程:\n\n### 0. main()\n\n主函数内部做了两件事情,一个是实例化一个对象,一个是循环执行类方法\n\n```\nint main(int argc, char** argv)\n{\n \n ros::init(argc, argv, \"lego_loam\");\n\n ROS_INFO(\"\\033[1;32m---->;\\033[0m Feature Association Started.\");\n\n // 1. 在构造函数中订阅消息和消息回调函数\n FeatureAssociation FA;\n\n ros::Rate rate(200);\n // 2. 循环调用runFeatureAssociation,函数的主流程所在\n while (ros::ok())\n {\n \n ros::spinOnce();\n\n FA.runFeatureAssociation();\n\n rate.sleep();\n }\n \n ros::spin();\n return 0;\n}\n\n```\n\n主函数里面首选实例化了一个对象 FA ,所以和之前的ImageProjection 处理过程一样,执行构造函数的内容,所以在构造函数中会订阅上一个cpp 文件中 pub 出来的消息。然后转到回调函数中处理数据,此处的回调函数都是将相应的信息存储到buff 中,所以不做详细分析。\n\n消息回调主要是接收上一个步骤(点云分割)中分割好的点云消息。\n\n```\n FeatureAssociation():\n nh(\"~\")\n {\n \n // 1. 接收消息,上一步分割好的点云\n // 订阅了分割之后的点云\n subLaserCloud = nh.subscribe<;sensor_msgs::PointCloud2>;(\"/segmented_cloud\", 1, &FeatureAssociation::laserCloudHandler, this);\n \n // 订阅的分割点云含有图像的深度信息\n subLaserCloudInfo = nh.subscribe<;cloud_msgs::cloud_info>;(\"/segmented_cloud_info\", 1, &FeatureAssociation::laserCloudInfoHandler, this);\n \n // 非聚类的点\n subOutlierCloud = nh.subscribe<;sensor_msgs::PointCloud2>;(\"/outlier_cloud\", 1, &FeatureAssociation::outlierCloudHandler, this);\n \n // IMU传感器的消息\n subImu = nh.subscribe<;sensor_msgs::Imu>;(imuTopic, 50, &FeatureAssociation::imuHandler, this);\n \n // 2. 发布消息\n // 发布面特征点 和 边特征点\n pubCornerPointsSharp = nh.advertise<;sensor_msgs::PointCloud2>;(\"/laser_cloud_sharp\", 1);\n pubCornerPointsLessSharp = nh.advertise<;sensor_msgs::PointCloud2>;(\"/laser_cloud_less_sharp\", 1);\n pubSurfPointsFlat = nh.advertise<;sensor_msgs::PointCloud2>;(\"/laser_cloud_flat\", 1);\n pubSurfPointsLessFlat = nh.advertise<;sensor_msgs::PointCloud2>;(\"/laser_cloud_less_flat\", 1);\n\n pubLaserCloudCornerLast = nh.advertise<;sensor_msgs::PointCloud2>;(\"/laser_cloud_corner_last\", 2);\n pubLaserCloudSurfLast = nh.advertise<;sensor_msgs::PointCloud2>;(\"/laser_cloud_surf_last\", 2);\n pubOutlierCloudLast = nh.advertise<;sensor_msgs::PointCloud2>;(\"/outlier_cloud_last\", 2);\n pubLaserOdometry = nh.advertise<;nav_msgs::Odometry>; (\"/laser_odom_to_init\", 5);\n \n initializationValue();\n }\n\n```\n\n下面我们具体看这4个消息\n\n在理解了上述4个消息之后,我们分别看下他们的回调,点云消息的回调主要是把ROS的消息转换为点云,IMU的回调主要是把IMU的消息放入buffer中。\n\n```\n // 1. 接收\"/segmented_cloud\"消息,保存到segmentedCloud\n void laserCloudHandler(const sensor_msgs::PointCloud2ConstPtr& laserCloudMsg){\n \n\n cloudHeader = laserCloudMsg->;header;\n\n timeScanCur = cloudHeader.stamp.toSec();\n timeNewSegmentedCloud = timeScanCur;\n\n \n```\n -->

关于博主
an actually real engineer
通信工程专业毕业,7年开发经验
技术栈:
精通c/c++
精通golang
熟悉常见的脚本,js,lua,python,php
熟悉电路基础,嵌入式,单片机
耕耘领域:
服务端开发
嵌入式开发
>gin接口代码CURD生成工具
sql ddl to struct and markdown,将sql表自动化生成代码内对应的结构体和markdown表格格式,节省宝贵的时间。
qt .ui文件转css文件
duilib xml 自动生成绑定控件代码
协议调试器
基于lua虚拟机的的协议调试器软件 支持的协议有:
串口
tcp客户端/服务端
udp 组播/udp节点
tcp websocket 客户端/服务端
软件界面

使用例子: 通过脚本来获得接收到的数据并写入文件和展示在界面上
下载地址和源码
webrtc easy demo
webrtc c++ native 库 demo 实现功能:
基于QT
webrtc摄像头/桌面捕获功能
opengl渲染/多播放窗格管理
janus meeting room
下载地址和源码
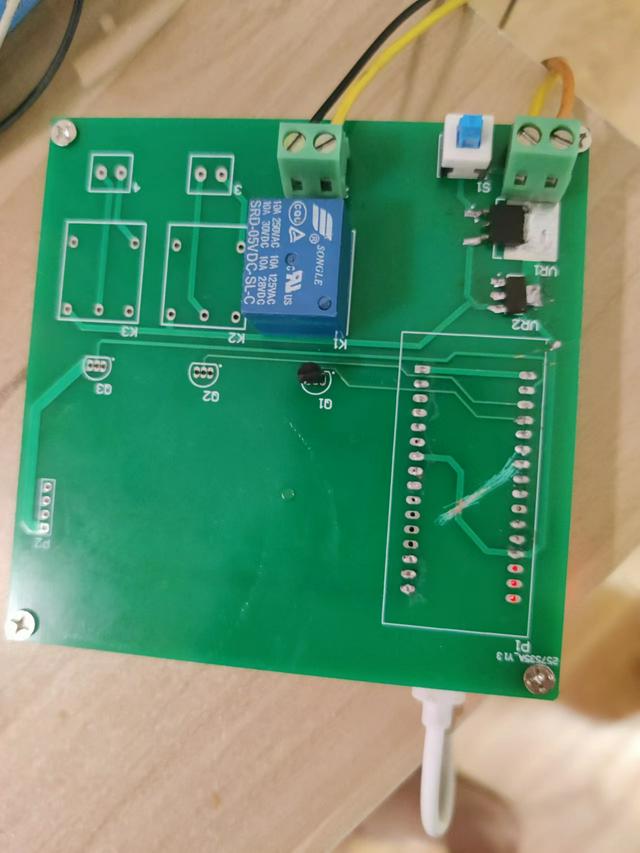
wifi,蓝牙 - 无线开关
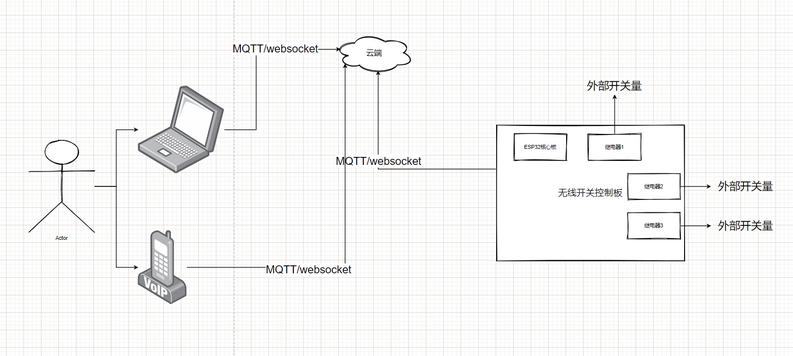
实现功能:
通过wifi/蓝牙实现远程开关电器或者其他电子设备
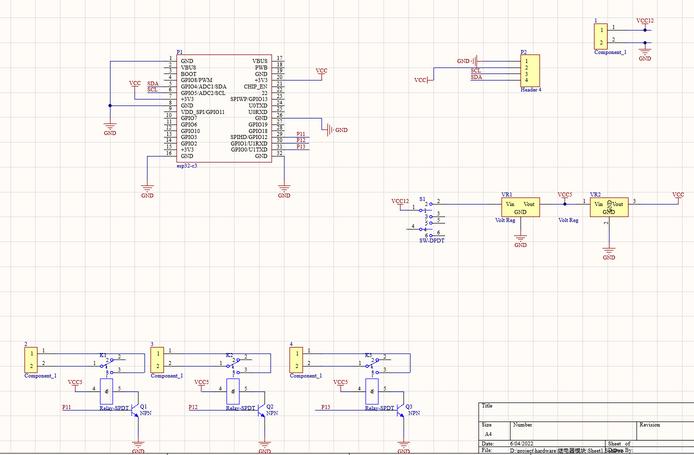
电路原理图:
实物图:
深度学习验证工具
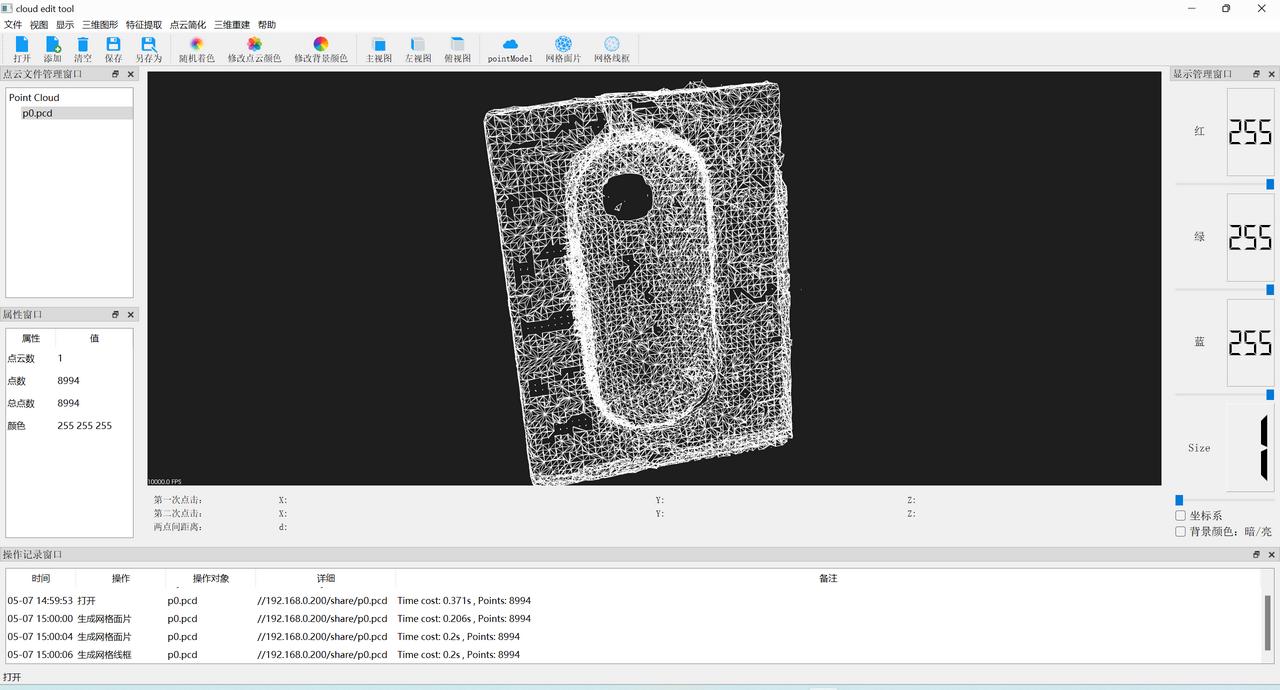
虚拟示波器
硬件实物图:

实现原理
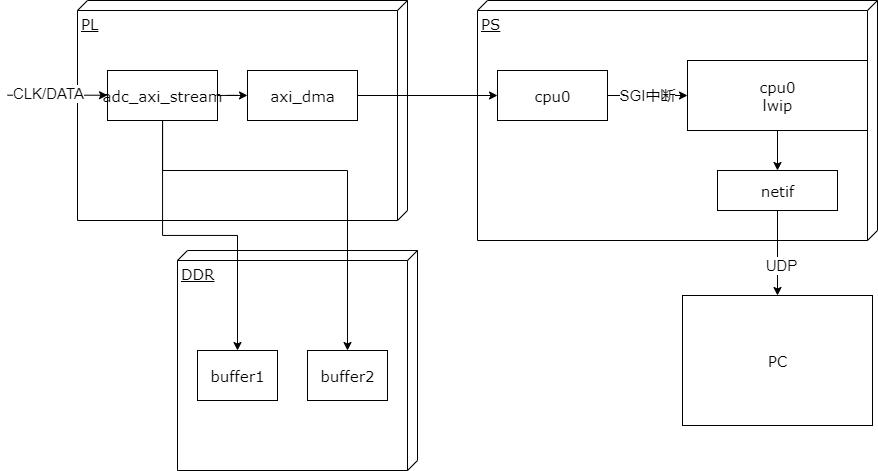
基本性能
采集频率: 取决于外部adc模块和ebaz4205矿板的以太网接口速率,最高可以达到100M/8 约为12.5MPS
上位机实现功能: 采集,显示波形,存储wave文件。
参数可运行时配置
上位机:

显示缓冲区大小可调
刷新率可调节
触发显示刷新可调节


又一个modbus调试工具
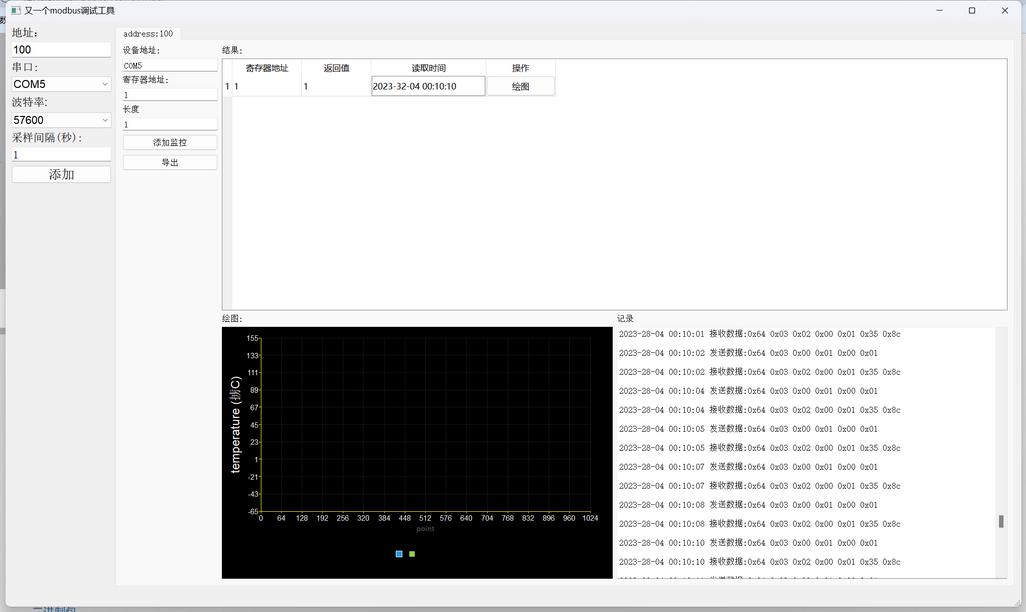
最近混迹物联网企业,发现目前缺少一个简易可用的modbus调试工具,本软件旨在为开发者提供一个简单modbus测试工具。 主打一个代码简单易修改。 特点:
1. 基于QT5
2. 基于libmodbus
3. 三方库完全跨平台,linux/windows。

开源plutosdr 板卡

1. 完全开源
2. 提高固件定制服务
3. 硬件售价450 手焊产量有线
测试数据
内部DDS回环测试

接收测试
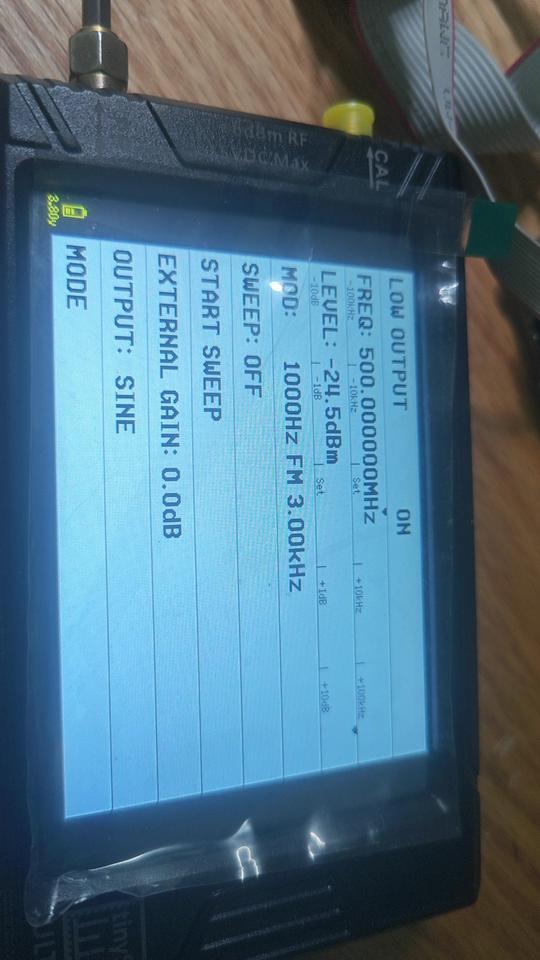
外部发送500MHZ FM波形
matlab测试

2TRX版本
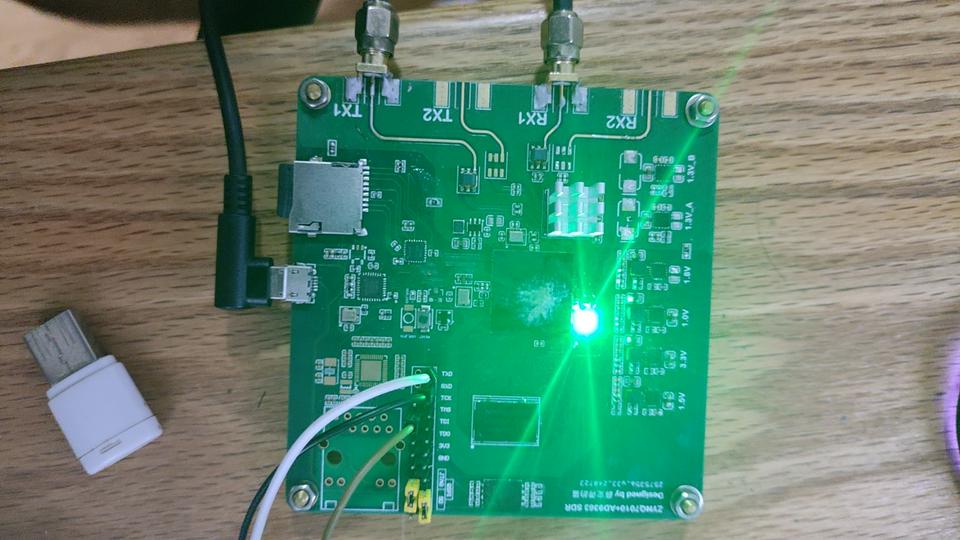
大部分plutosdr应用场景都是讲plutosdr板卡作为射频收发器来使用。 实际上plutosdr板卡本身运行linux 操作系统。是具有一定脱机运算的能力。 对于一些微型频谱检测,简单射频信号收发等应用完全可以将应用层直接实现在板卡上 相较于通过网卡或者USB口传输具有更稳定,带宽更高等优点。 本开源板卡由于了SD卡启动,较原版pluto支持了自定义启动应用的功能。 提供了应用层开发SDK(编译器,buildroot文件系统)。 通过usb连接电脑,经过RNDIS驱动可以近似为通过网卡连接 (支持固件的开发定制)。
二次开发例子
``` all: arm-linux-gnueabihf-gcc -mfloat-abi=hard --sysroot=/root/v0.32_2trx/buildroot/output/staging -std=gnu99 -g -o pluto_stream ad9361-iiostream.c -lpthread -liio -lm -Wall -Wextra -lrt clean: rm pluto_stream
版面分析即分析出图片内的具体文件元素,如文档标题,文档内容,文档页码等,本工具基于cnstd模型